
9_MIN_READAI video editing
Fix an AI Video Without Generating the Entire Scene Again
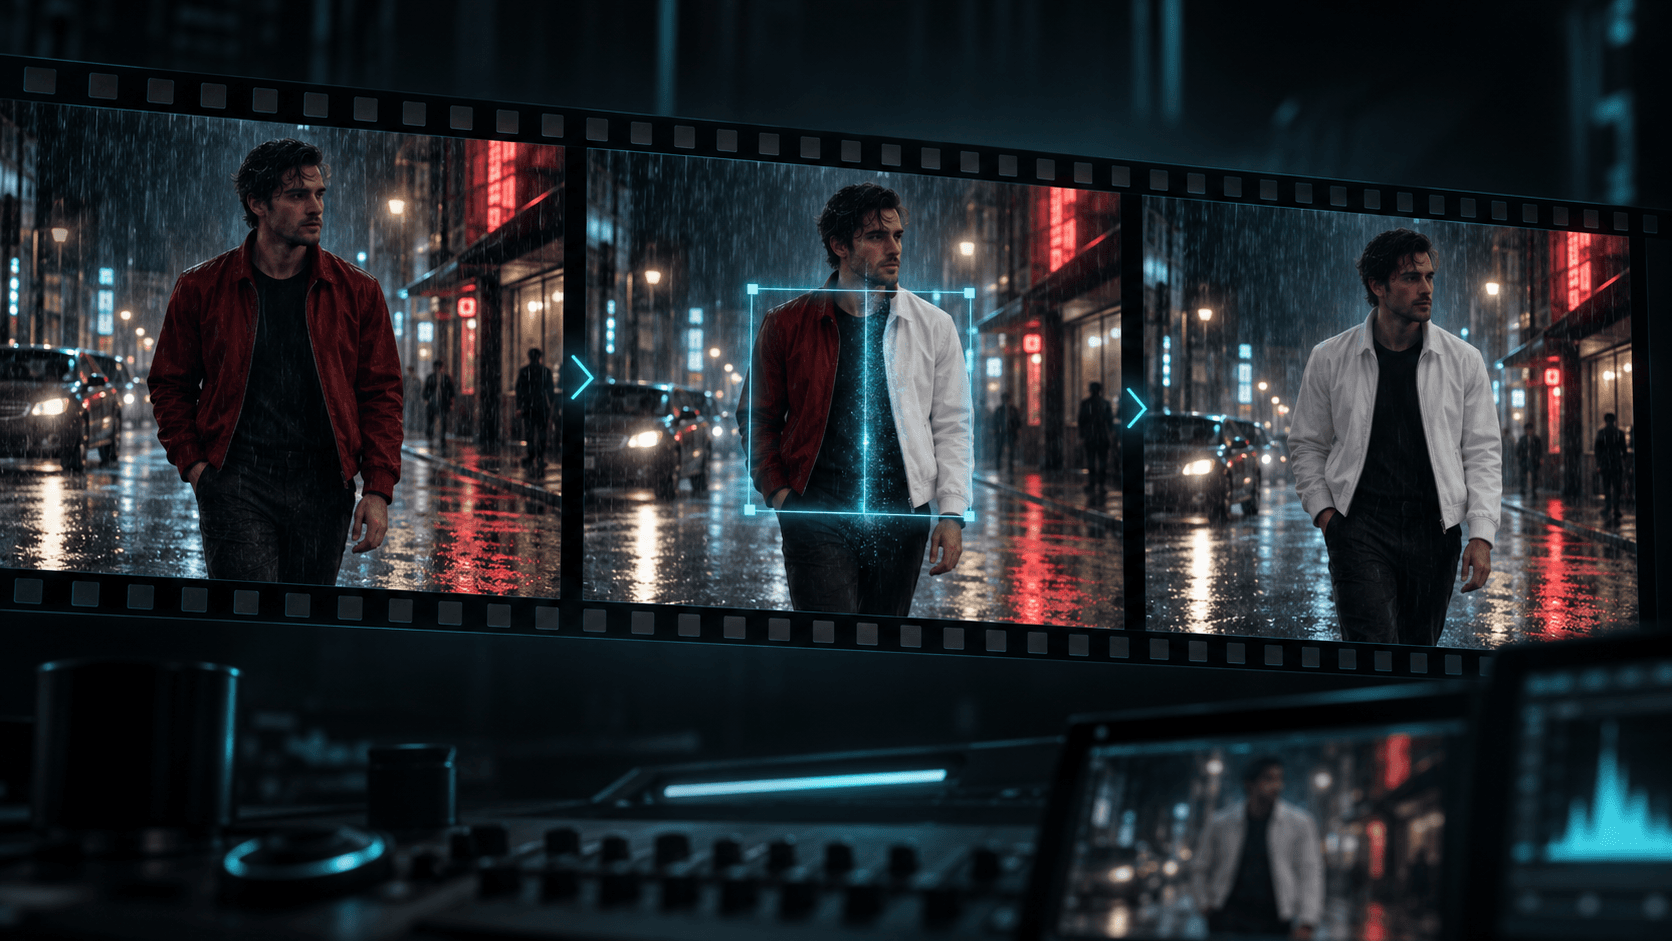
Learn how to replace a product, outfit, character, location, or small detail in an AI video while keeping the approved motion, camera, timing, and performance.
You finally have a strong AI video. The camera move works, the timing feels right, and the character's performance is convincing. Then you notice one problem: the jacket is wrong, the product changed shape, or an unwanted object appeared in the background.
Generating the complete shot again can fix that problem, but it can also change everything that already works. The camera may drift, the actor may perform differently, and the timing may no longer fit your edit.
This workflow shows how to repair one part of a finished clip while preserving the rest of the shot.
What you will learn
By the end of this tutorial, you will know how to:
- Choose the right type of AI video edit
- Prepare a clean reference image
- Replace a product, outfit, character, or location
- Preserve motion, camera movement, and timing
- Write a short edit prompt that does not change unrelated details
- Review the result before using it in a final project
For the main example, we will replace a red jacket with a white jacket while keeping the person, face, walk, rain, street, camera, and timing unchanged.
What you need
- A finished source video with one clear problem
- A reference image showing the replacement item or design
- Access to Higgsfield Genjutsu
- A video editor for comparing and trimming the final result
Use a source clip and reference assets that you own or have permission to edit.
Choose the correct editing method
Before uploading anything, decide what actually needs to change.
| Problem | Recommended method |
|---|---|
| Replace a product, prop, outfit, person, or location | Genjutsu Object Swap |
| Keep the movement but rebuild the character or complete world | Genjutsu Motion Transfer |
| Correct a small marked area or local visual mistake | Seedance 2.5 Edit |
| Change only light direction, colour, or intensity | Video Relight |
| Change the action, performance, duration, or shot structure | Generate a new shot |
Object Swap is the best starting point when most of the clip is already correct. Motion Transfer is better when you want to keep the choreography and camera but rebuild much more of the visible scene.
Step 1: Choose the strongest source clip
Start with the best version of your shot, even if it contains one visual mistake. The source should already have:
- The correct performance
- The correct camera movement
- Good timing
- Stable anatomy
- Usable lighting
- Enough image quality for the final output
Do not use an edit tool to rescue a clip with several unrelated problems. Local editing works best when the approved shot needs one focused correction.
Trim away any frames you do not need. A shorter clip is easier to inspect and gives the model less opportunity to change unrelated details.
Step 2: Define one exact change
Write the change in one sentence before opening the tool.
For our example:
Replace only the red jacket with the white jacket from the reference image.
This sentence becomes the centre of the prompt. If you cannot describe the edit clearly, the request may be too broad for one pass.
Good edit requests include:
- Replace the bottle on the table with the supplied product.
- Change only the actor's jacket to the reference jacket.
- Replace the background with the supplied studio interior.
- Replace the performer with the person in the character reference.
- Remove the unwanted bag from the floor and restore the visible surface.
Avoid combining several edits in the first attempt. Replace the product first, review it, and then make a second pass for the background if needed.
Step 3: Prepare the reference image
The replacement reference should make the requested object easy to understand.
For a product or prop:
- Use a sharp image with a clean silhouette
- Keep the front label and important details readable
- Match the viewing angle when possible
- Avoid hands covering the object
- Include extra views if the object rotates in the video
For clothing:
- Show the complete garment
- Include the front and back if both appear in the clip
- Keep colours and materials clear
- Use a neutral background
For a person:
- Use a clear face image
- Add a full-body reference when body shape matters
- Include side or three-quarter views for turning shots
- Keep hairstyle and clothing consistent across references
The better the reference explains the replacement, the less the model has to invent.
Step 4: Upload the clip to Genjutsu
Open Higgsfield Genjutsu and choose Object Swap.
- Upload the finished video as the source clip.
- Add the replacement image as a reference.
- Select the object or element that needs to change if the interface provides a selection control.
- Enter a short edit prompt.
- Generate a test before adding more instructions.
Keep the source clip's original aspect ratio. Use the highest practical output quality for the version you plan to deliver.
Step 5: Write the edit prompt
A reliable edit prompt has three parts:
- State exactly what should change.
- Name the reference that controls the replacement.
- List the parts of the source video that must stay unchanged.
Main outfit replacement prompt
Replace only the red jacket worn by the main performer with the matte white jacket shown in the uploaded reference image.

Keep the performer's face, identity, hairstyle, body shape, black shirt, trousers, hands, walking performance, pose, expression, and position unchanged. Preserve the original rainy street, cars, reflections, background people, lighting, camera angle, camera movement, framing, timing, motion blur, and colour grade.

Make the white jacket follow the body naturally in every frame. Preserve realistic fabric folds, rain, shadows, reflections, sleeve movement, and contact around the shoulders, arms, waist, and hands.

Change only the jacket. Do not alter the person, environment, motion, camera, duration, or any other clothing.
The first and last lines repeat the edit boundary. That repetition helps the model focus on the selected element.
Step 6: Generate and compare
Place the original and edited clips next to each other or stack them on separate tracks in your editor. Watch the result several times, checking one area at a time.
Check the replacement
- Does the new item match the reference?
- Are its shape, colour, logo, and material stable?
- Does it follow movement and perspective correctly?
- Do hands pass in front of it naturally?
Check the preserved shot
- Did the face change?
- Did the background move or regenerate?
- Did the camera path change?
- Did the timing shift?
- Did any unrelated object disappear?
- Did the colour grade or exposure change?
An edit is successful only when the requested element improves and the approved parts remain stable.
Step 7: Correct one remaining issue
If the first result is close, keep the same source and reference. Add one short correction instead of rewriting the entire prompt.
If the face changes
Preserve the original face and identity exactly. Change only the jacket.
If the garment flickers
Keep the white jacket design, material, collar, sleeves, and colour consistent in every frame.
If the background changes
Preserve every background pixel, reflection, light source, vehicle, and person from the source video. Edit only the jacket.
If the replacement floats or clips
Attach the jacket naturally to the body. Match the original shoulder, arm, torso, and hand movement with correct fabric contact and occlusion.
Generate again and compare only the issue you corrected.
Prompt examples for common fixes
Replace a product
Replace only the bottle held by the actor with the product shown in the uploaded reference images. Preserve the exact product shape, cap, label layout, colours, materials, and proportions.

Keep the actor, hand grip, finger placement, performance, background, lighting, shadows, reflections, camera movement, focus, framing, timing, and colour grade unchanged. Match the new product to the original perspective and movement. Change nothing except the bottle.
Replace a character while keeping the performance
Use Motion Transfer when the new person should perform the same movement.
Recast the main performer using the uploaded character references. Keep the source video's body movement, gestures, expression timing, walking speed, camera path, framing, cuts, and duration.

Preserve the new character's face, hairstyle, body proportions, outfit, and identity throughout the clip. Keep the original environment and lighting unchanged. Do not invent new actions or camera movement.
Replace the location
Replace only the original location with the modern studio interior shown in the reference images. Preserve the performer, face, clothing, movement, timing, camera path, framing, and scale.

Match the new environment to the source perspective. Rebuild contact shadows, reflections, depth, and lighting so the performer belongs naturally in the studio. Do not alter the performance or camera.
Remove an unwanted object
Remove only the black equipment bag from the floor. Reconstruct the floor surface behind it using the surrounding texture, reflections, rain, shadows, and perspective.

Preserve the performer, all other objects, background, lighting, camera movement, framing, timing, and colour grade exactly. Do not add a replacement object.
Correct a small local mistake
For a broken hand, label error, or small damaged region, use a local edit tool when available.
Correct only the selected hand. Restore natural finger anatomy and the original hand position while preserving the same gesture, sleeve, lighting, shadows, motion blur, actor identity, background, camera, and timing. Do not change any area outside the selection.
Change only the lighting
Relight the existing shot with soft warm sunset light coming from camera left. Add natural warm highlights and soft directional shadows while preserving every person, object, texture, movement, camera angle, timing, and composition.
When you should generate a new shot
Local editing is not the best choice when you need to:
- Change the actor's action or emotion
- Add a new interaction that was not present in the source
- Replace an object with something that has a very different size or shape
- Change the shot duration or editing rhythm
- Move the camera along a new path
- Repair several connected problems across the complete frame
Those changes affect the structure of the shot. A fresh generation will usually look more natural than several stacked repairs.
A simple editing order for difficult clips
When a clip needs more than one correction, use this order:
- Lock the approved source clip.
- Fix the character or product.
- Fix the environment.
- Correct small local details.
- Adjust lighting.
- Upscale and finish the colour grade.
Export and save each approved stage. If a later edit fails, you can return to the last clean version.
Final checklist
Before using the edited clip, confirm that:
- Only the requested element changed
- The replacement remains stable in every frame
- Hands and objects overlap naturally
- The face and identity remain unchanged
- Motion and camera timing match the original
- The background and lighting stay consistent
- The first and final frames do not jump
- The output resolution and frame rate match your project
Final thought
The best AI video edit is often the one viewers never notice. A good repair preserves the performance and simply removes the detail that was distracting from it.
Start with one clear change, use a strong reference, and tell the model exactly what must stay untouched. This gives you a faster and more controlled route to a finished shot without rebuilding work that was already approved.
Tool reference: Higgsfield Genjutsu. Features and limits can change, so check the current generator before starting a client project.
Join the conversation
Ask a question, share an idea, or leave a little appreciation.
Loading discussion…
// MORE_TRANSMISSIONS
Spider-Man: Brand New Day Swinging Scene With Higgsfield Genjutsu
Create a cinematic web-swinging shot with a supplied depth map, a GPT Image 2 character sheet, and Higgsfield Genjutsu Motion Transfer.
READ_TRANSMISSION
Spider Swing Cinematic AI Video: A Seedance 2.5 Depth Pass Workflow
Learn how to combine a clean character sheet, a depth-pass motion reference, and Seedance 2.5 to create a cinematic AI action sequence with stronger identity and motion consistency.
READ_TRANSMISSION
Is It Safe to Use AI in Business? Risks, Safety & Strategies
Discover if using AI in business is safe. Explore key risks, IP protection, security best practices, and enterprise strategies for safe AI adoption.
READ_TRANSMISSION